Tests
Image analaysis
DeepACSA currently does not include formal unit testing.
However, the DeepACSA_example_v0.3.2.zip folder available for download here contains an images_test folder with three rectus femoris images and an Original_Results.xlsx file.
These files can be used to verify that your setup is functioning correctly. To do so, follow the steps below after downloading the files as described in the Installation section:
Double click the installed
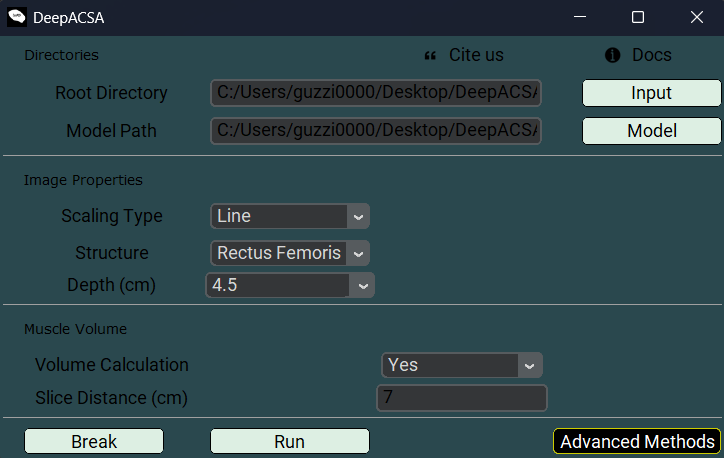
DeepACSA_v0.3.2icon to open the GUI.Click the Input button and select the root directory:
C:/Users/your_user/Desktop/DeepACSA_example_v0.3.2/images_test/.Click the Model button and select the model you downloaded from the Zenodo repository:
unet3plus_RectFem_v0.3.1.h5Select the Scaling type Line, structure Rectus Femoris, and an image depth (Depth (cm)) of 4.5.
Set the Volume Calculation to Yes and keep the Slice Distance (cm) at 7.
Click Run
After the analysis (which takes only a few seconds), two new files should appear in the
C:/Users/your_user/Desktop/DeepACSA_example_v0.3.2/images_test/folder:Analyzed_images.pdfandResults.xlsx.Compare your results with those in
Original_Results_v0.3.2.xlsx. If the results are identical, DeepACSA is working correctly. In theory, each pre-trained model should produce similar results.
Model training
To test wheter the model training option included in DeepACSA is functional, follow these steps:
Double click the installed
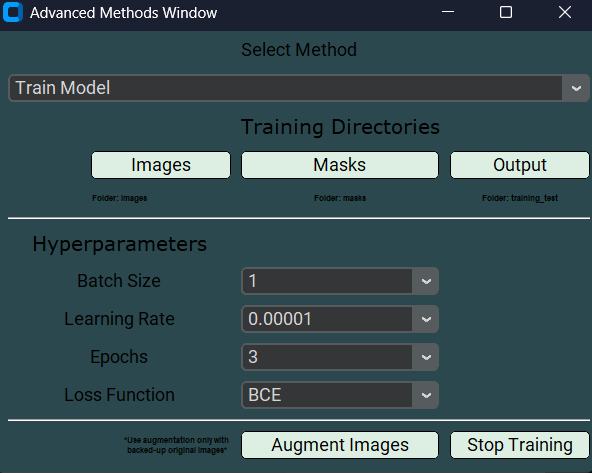
DeepACSA_v0.3.2icon to open the GUI..Click on Advanced Methods and select Train Model from the drop-down menu in the newly opened window.
Click the Images button and select the image directory:
C:/Users/your_user/Desktop/DeepACSA_example_v0.3.1/training_test/images.Click the Masks button and select the mask directory:
C:/Users/your_user/Desktop/DeepACSA_example_v0.3.1/training_test/masks.Click the Output button and select the output directory:
C:/Users/your_user/Desktop/DeepACSA_example_v0.3.1/training_test/.Leave all training hyperparameters as specified (Batch Size = 1, Learning Rate = 0.00001, Epochs = 3, Loss Function = BCE) and click the Start Training button.
A first pop-up window will inform you whether the images and masks have been properly loaded. A second pop-up window will inform you that the model has been compiled. Once you click “OK”, the training will start.
Once the training process is completed, you should find a
Training_Results.tifplot, aTest_Apo.h5model file and aTest_apo.csvfile containing the per-epoch training and validation metrics (i.e, IoU, accuracy, loss, and learning rate) in the output directory. If this is the case, the training process was succesful.